
|
It is currently Thu Apr 25, 2024 6:40 am |
|
All times are UTC - 8 hours |
 |
|
|
Page 25 of 31 |
[ 454 posts ] | Go to page Previous 1 ... 22, 23, 24, 25, 26, 27, 28 ... 31 Next |
| Print view | Previous topic | Next topic |
1926 Model TT Restoration: Engine/Trans Rebuild
| Author | Message |
|---|---|
|
Site Supporter   Location: Everson, WA Joined: Sun Jan 6, 2013 Posts: 28191 Real Name: Ace Winky |
100+ years of tech, now.
Great tutorial. Very cool.  _________________ Why does the Penguin in Batman sound like a duck? Because the eagle sounds like a hawk. |
| Wed Mar 09, 2022 6:16 am |
|
|
Site Supporter  Location: Tacoma Joined: Sat May 4, 2013 Posts: 6217 |
I am learning a lot about the engine and transmission through this rebuild. I have the advantage of learning from an expert, who also has the necessary specialized tools. Not saying this knowledge will be especially useful in the long haul, but it is interesting.
|
| Wed Mar 09, 2022 7:48 am |
|
|
Site Supporter  Location: South Seattle Joined: Thu May 2, 2013 Posts: 12475 Real Name: Steve |
Arisaka wrote: I am learning a lot about the engine and transmission through this rebuild. I have the advantage of learning from an expert, who also has the necessary specialized tools. Not saying this knowledge will be especially useful in the long haul, but it is interesting. Agreed…it’s fascinating  |
| Wed Mar 09, 2022 5:28 pm |
|
|
Site Supporter Location: Tacoma Joined: Sat May 4, 2013 Posts: 6217 |
Before transmission assembly can begin, you have to ream all the new bushings in the drums, flywheel, gears and driven plate. My buddy has a period set of Ford transmission reamers. Here is a set made by Stevens, who made many Model T tools back in the day
 Here is a reamer set for the entire car 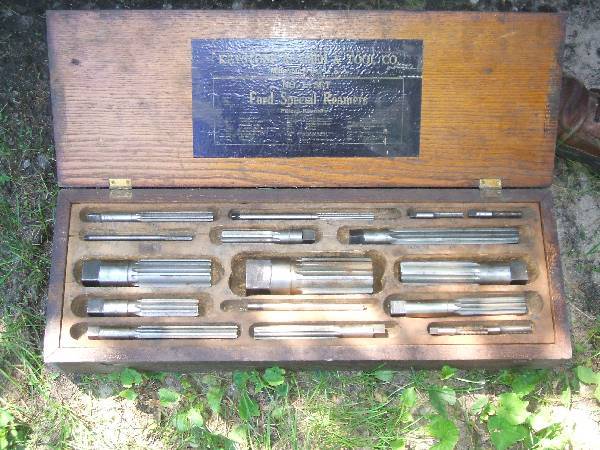 Here are the bushings, before installation. Starting at the top left, there are for the Reverse Drum, Low Speed Drum, Brake Drum (requires 2 each), Driven Plate and Triple Gears (requires 3 each). 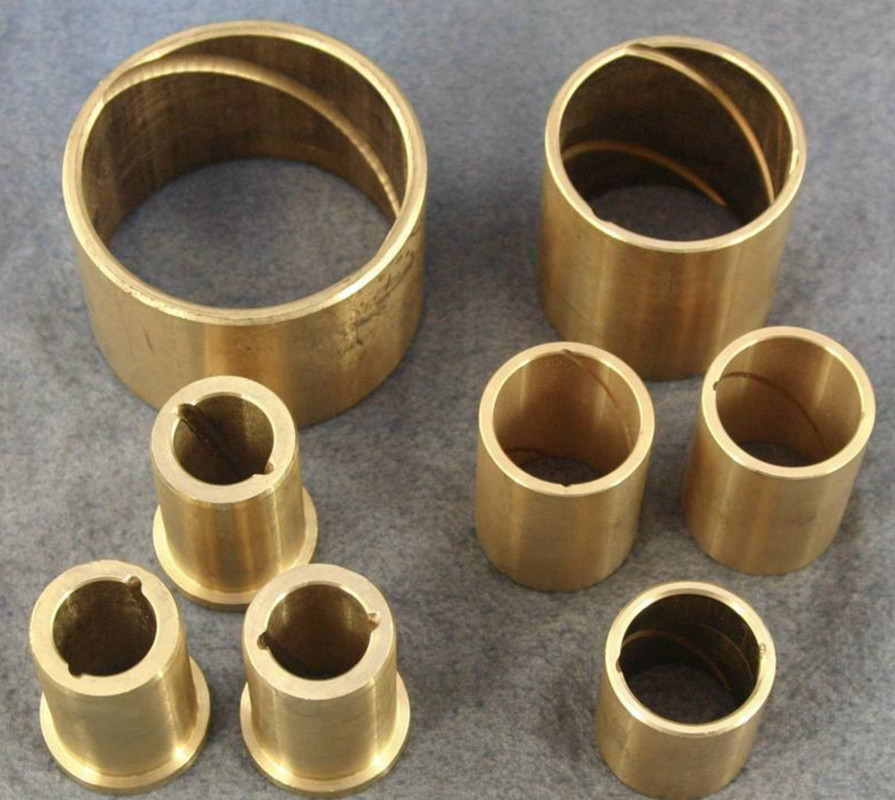 Here is the Reverse Drum: 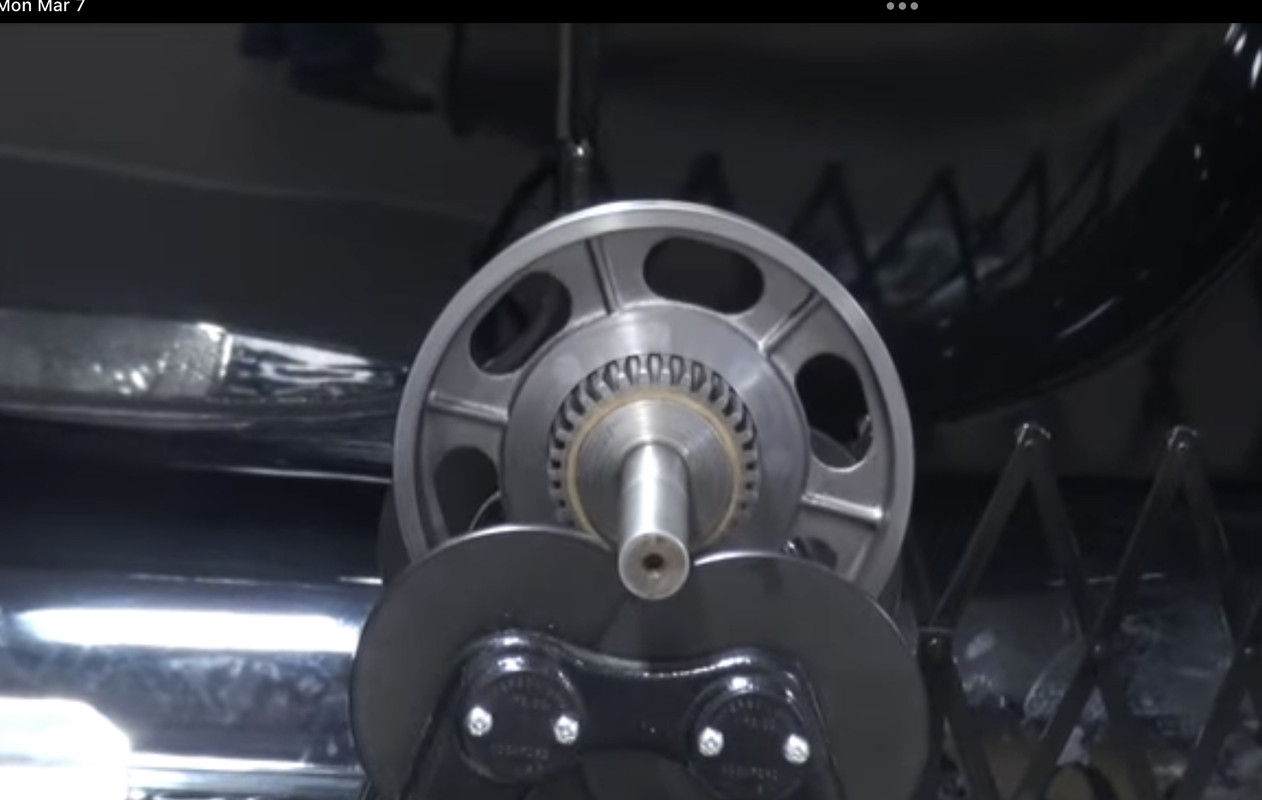 Low Speed Drum 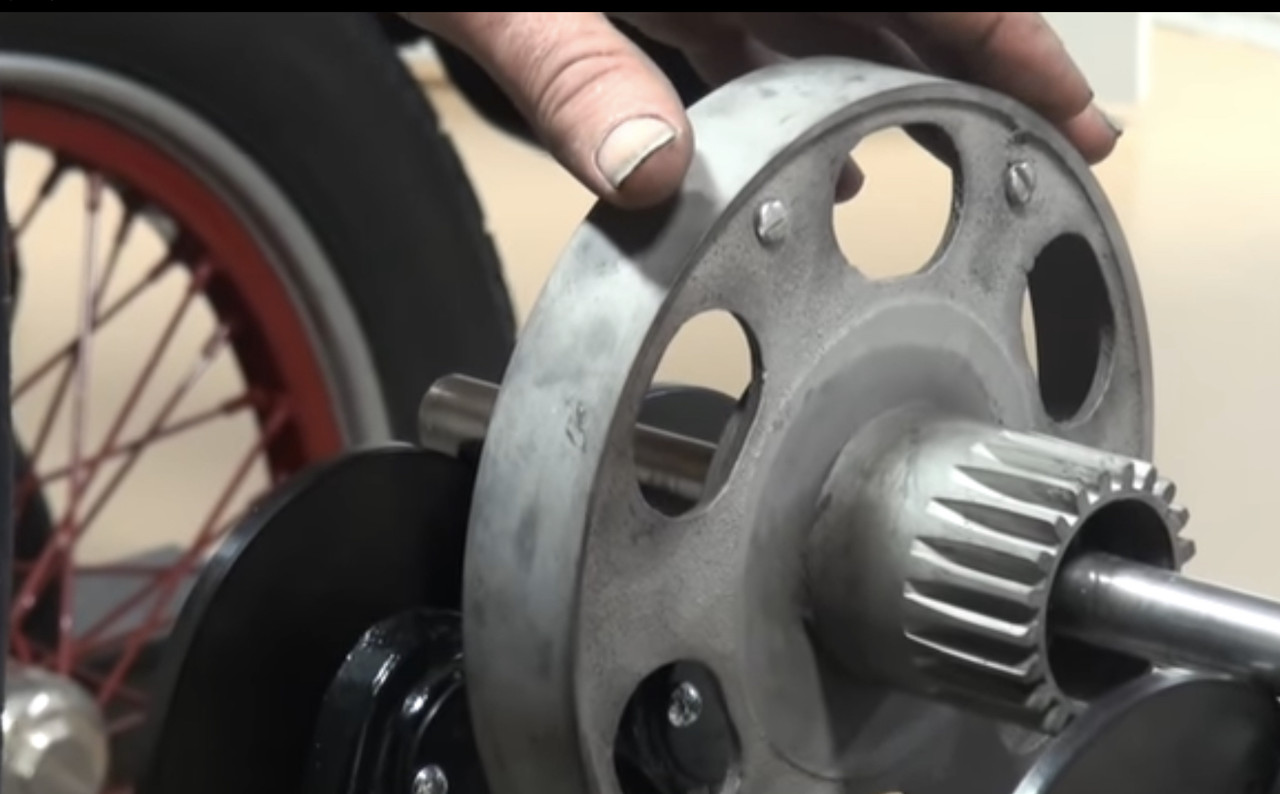 Brake Drum. One bushing in each end.  Driven Plate  Triple Gear.  The old bushings are driven out, and the new ones pressed in. Then they are all reamed to size. Next, the pins the triple gears rotate on are checked for wear and pitting. In necessary, they are driven out and replaced. 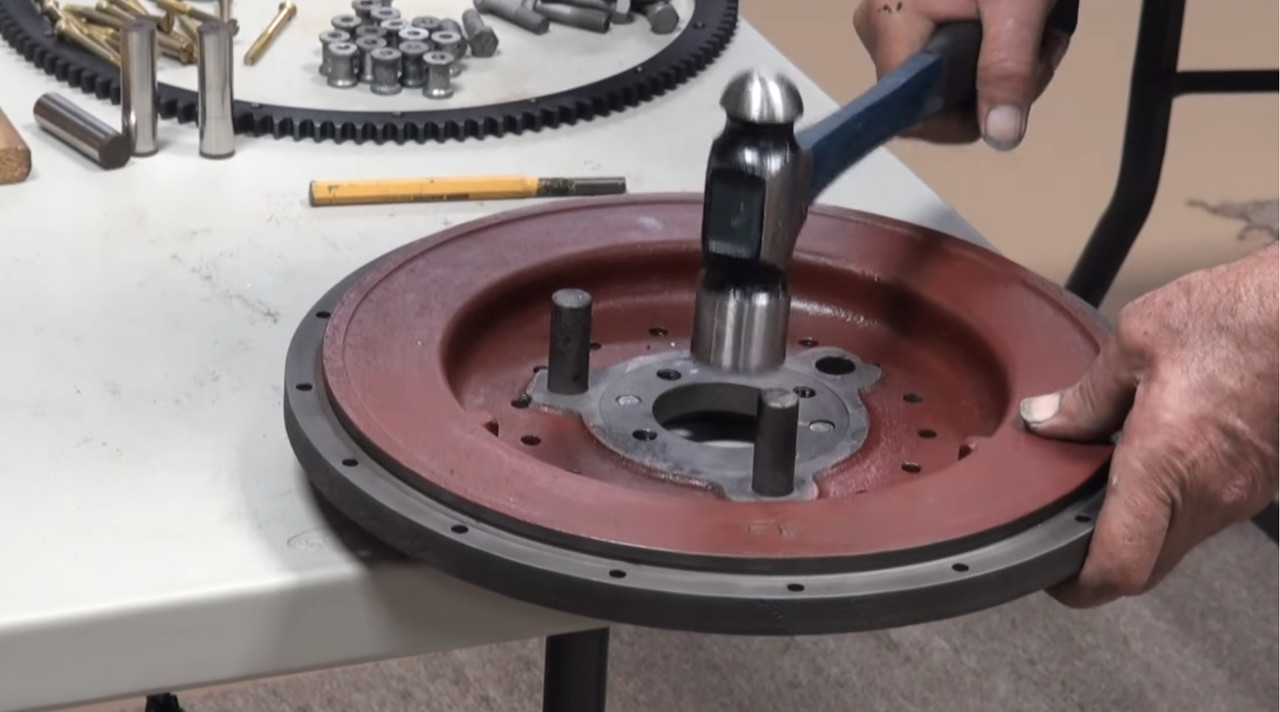 Here is a new triple gear pin It has a small shoulder at the top. They can be hammered into the flywheel, or driven in by a press. 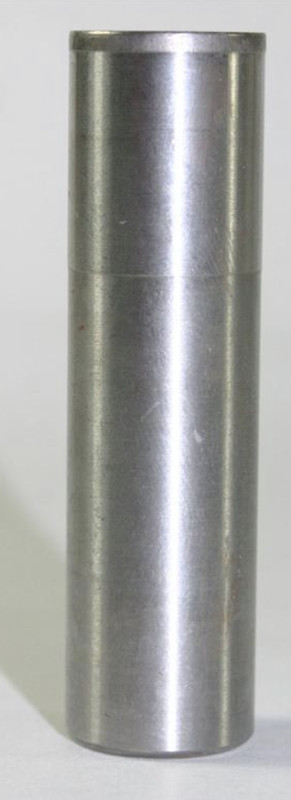 Assembly starts with the brake drum. The brake drum also houses the clutch plates. Those plates fit over bosses in the brake drum. As the clutch plates move around, they can wear grooves in the brake drum bosses. Here is the area that wears  These grooves worn into the drum can catch the clutch plates and prevent them from releasing. This means you don't have a good neutral. The brake drum can be fixed by filing away the grooves, or by installing special shoes on the drum over top of the worn bosses. 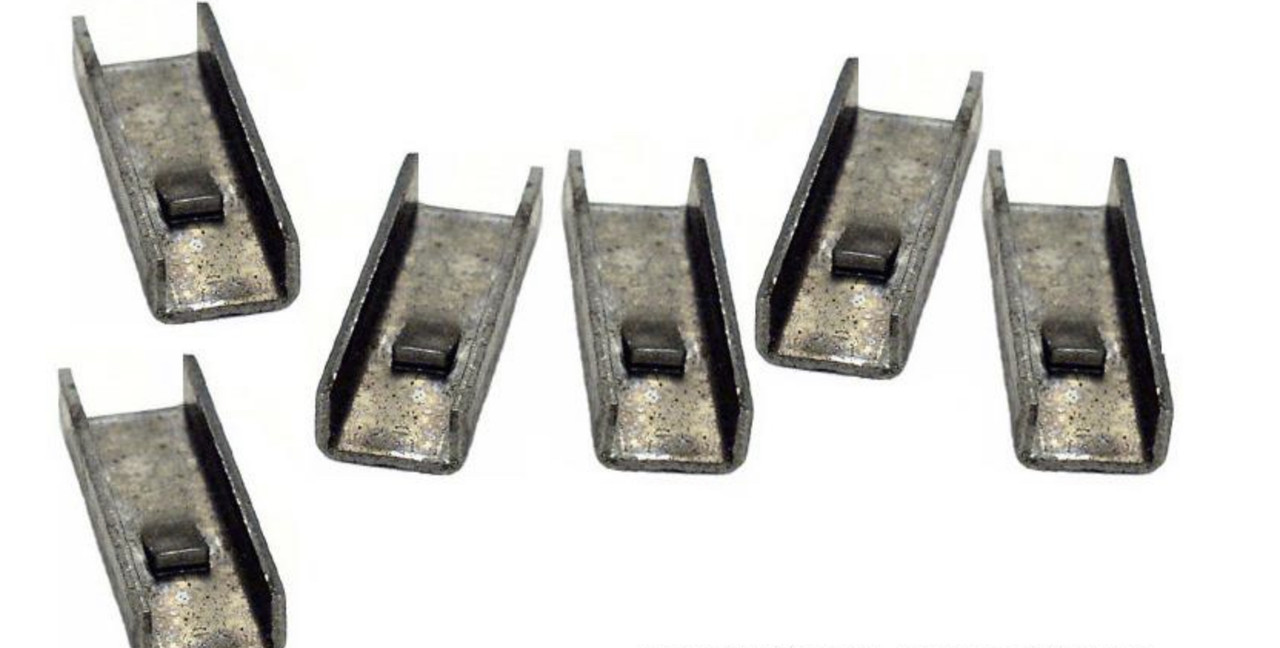 On top of the brake drum goes the low speed drum and then the reverse drum 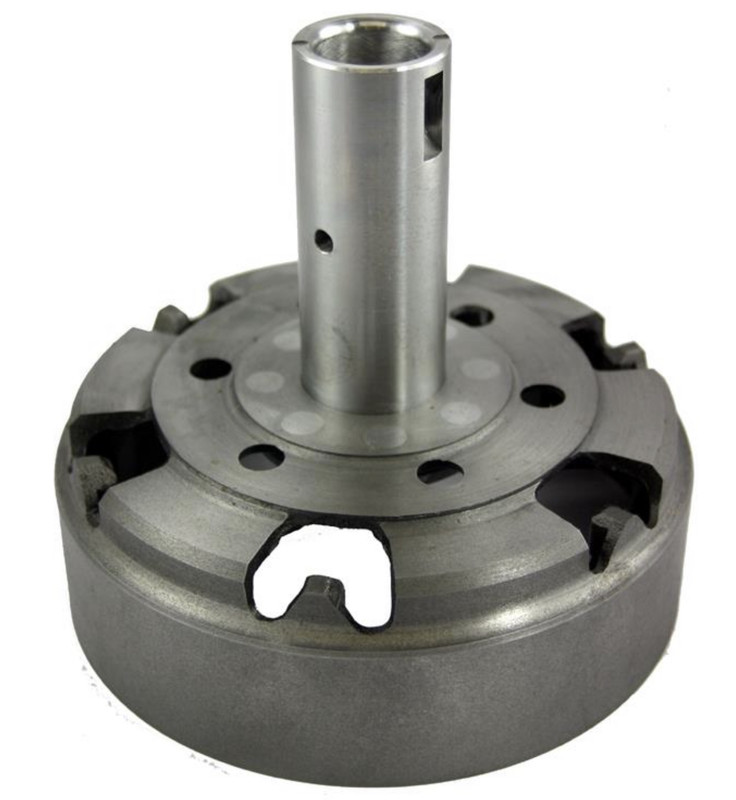 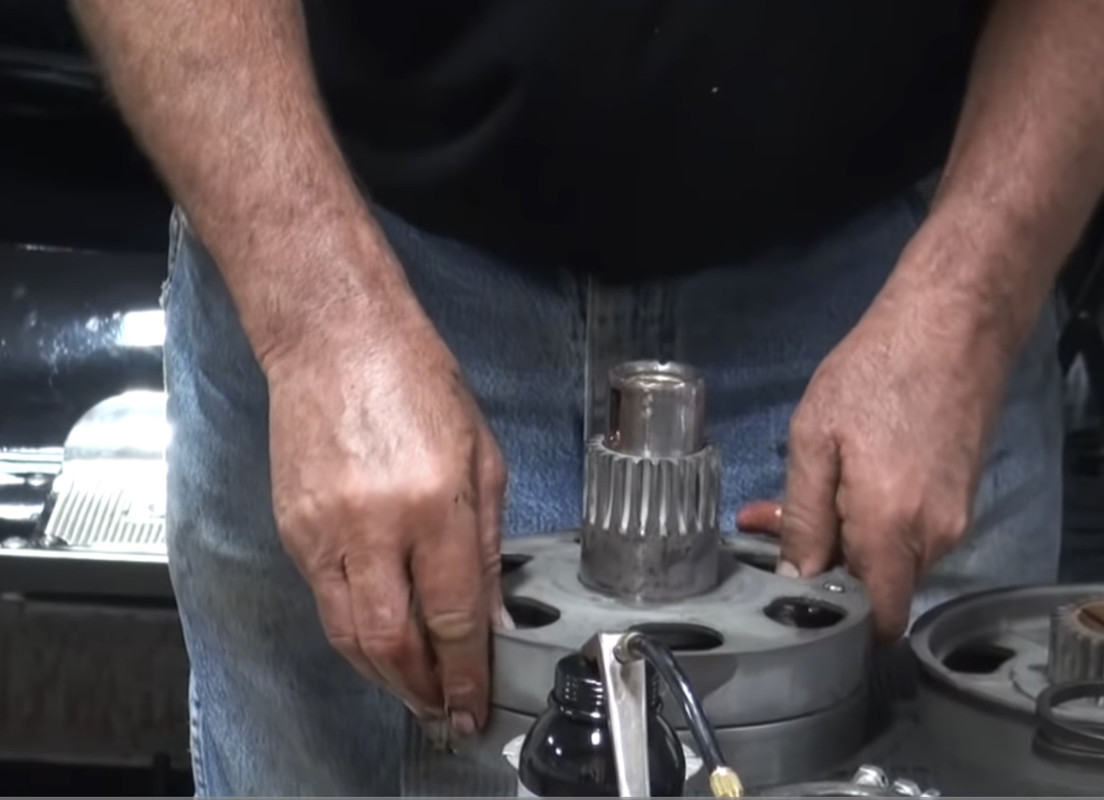 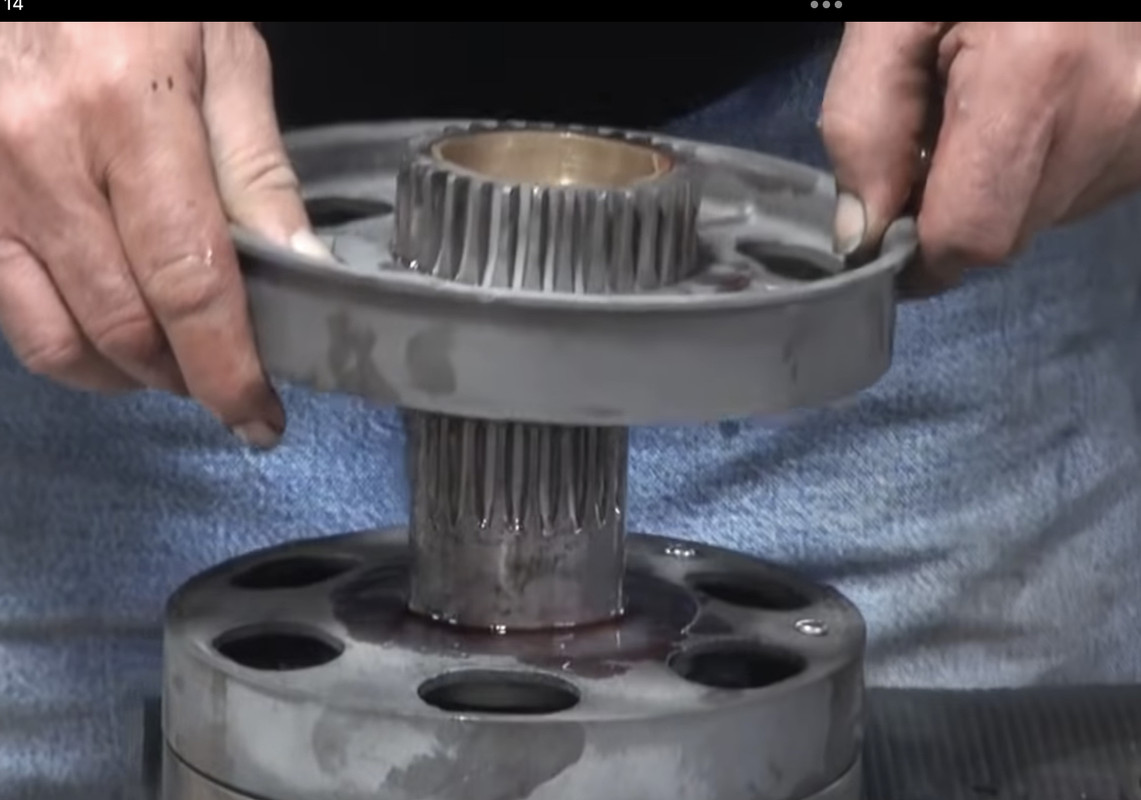 Oil or tranny fluid is used to lube up all the bushings during assembly 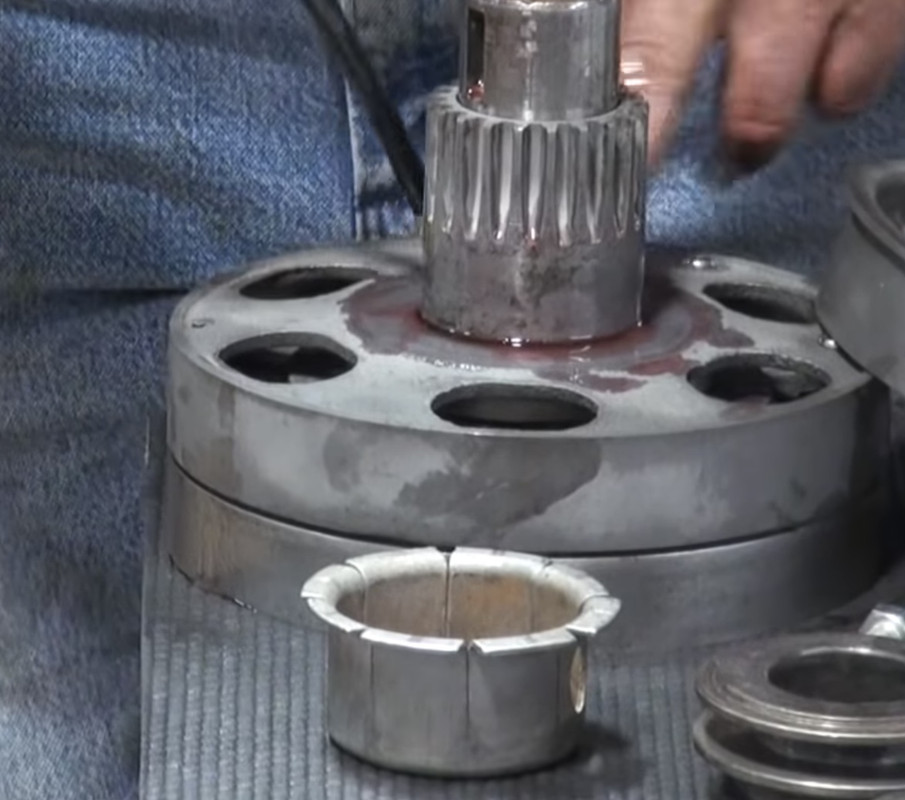 Next up is the triple gears, driven gear, clutch and driven plate. |
| Mon Mar 14, 2022 9:49 am |
|
|
Site Supporter Location: Tacoma Joined: Sat May 4, 2013 Posts: 6217 |
Now that all three drums are assembled, it's time to press the driven gear onto the brake drum shaft.
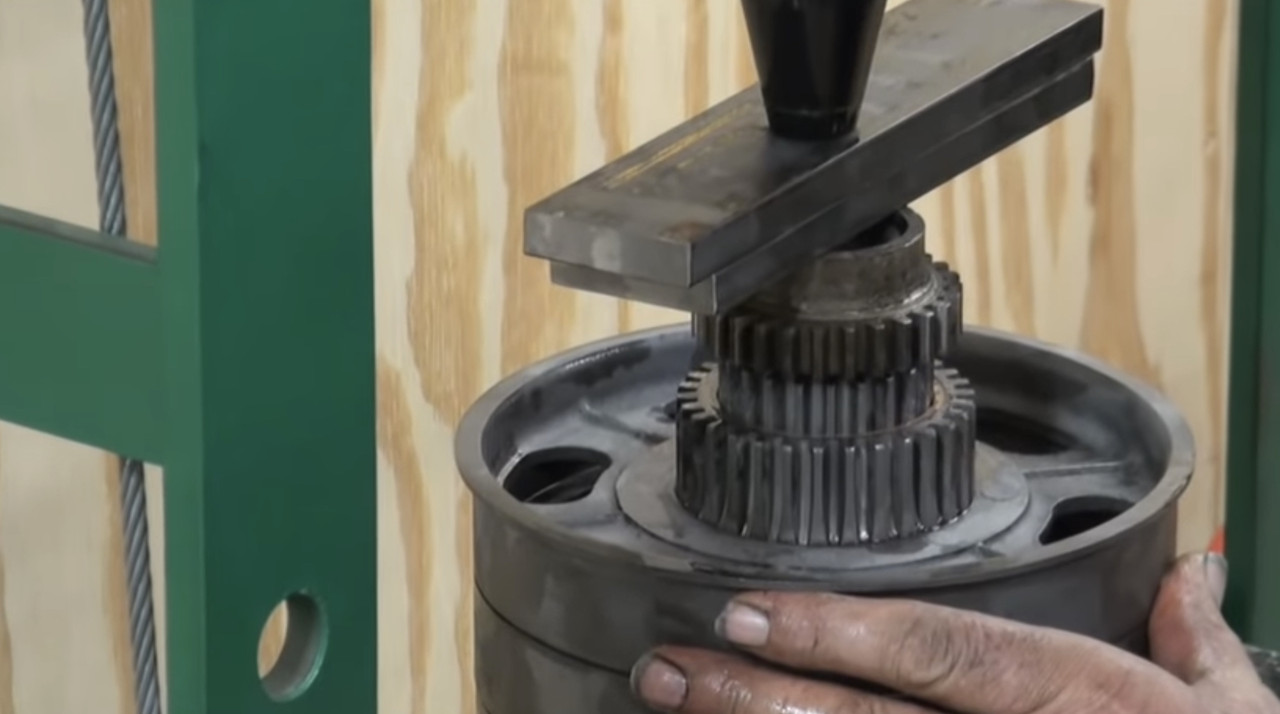 Next job is to install the triple gears around the driven gear. The triple gears are the "planets" in the planetary gear design. They rotate around the driven gear, which is the "sun" gear. Here is a triple gear, named for the three different gears sets on each triple gear The driven gear has 27 teeth. The triple gears are evenly spaced around the driven gear, at every ninth tooth. Each triple gear has a timing mark, and that mark goes towards the driven gear. Doing this is called "timing the triple gears". The timing mark is where the teeth on all three gear sets line up 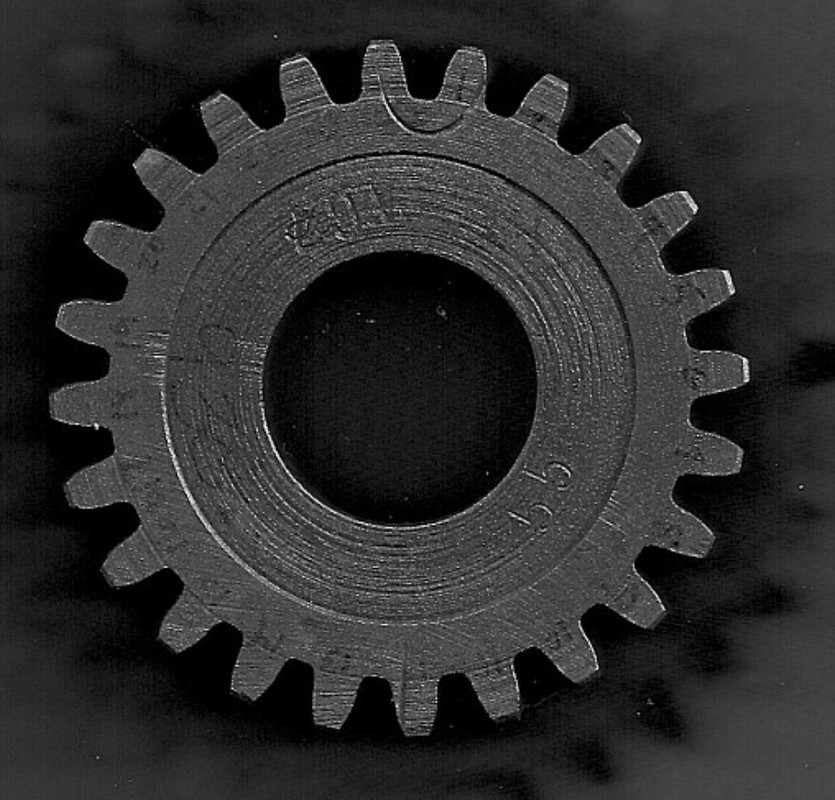 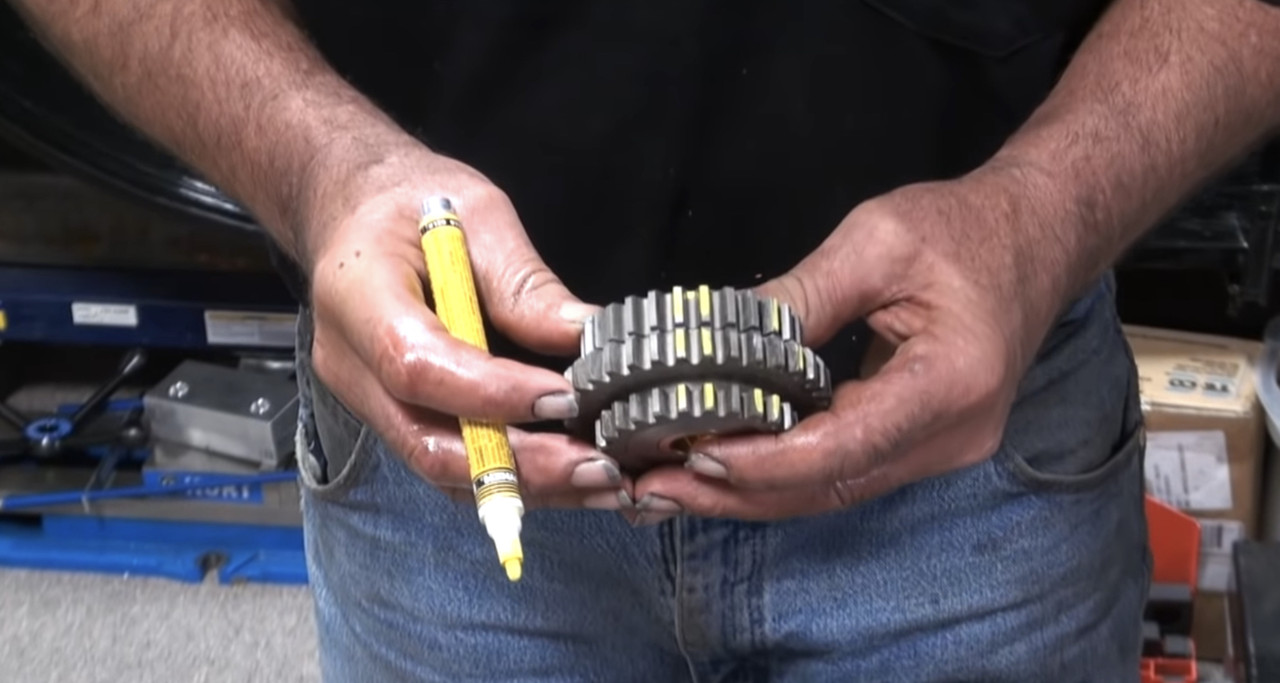 Here are all three triple gears, timed and installed 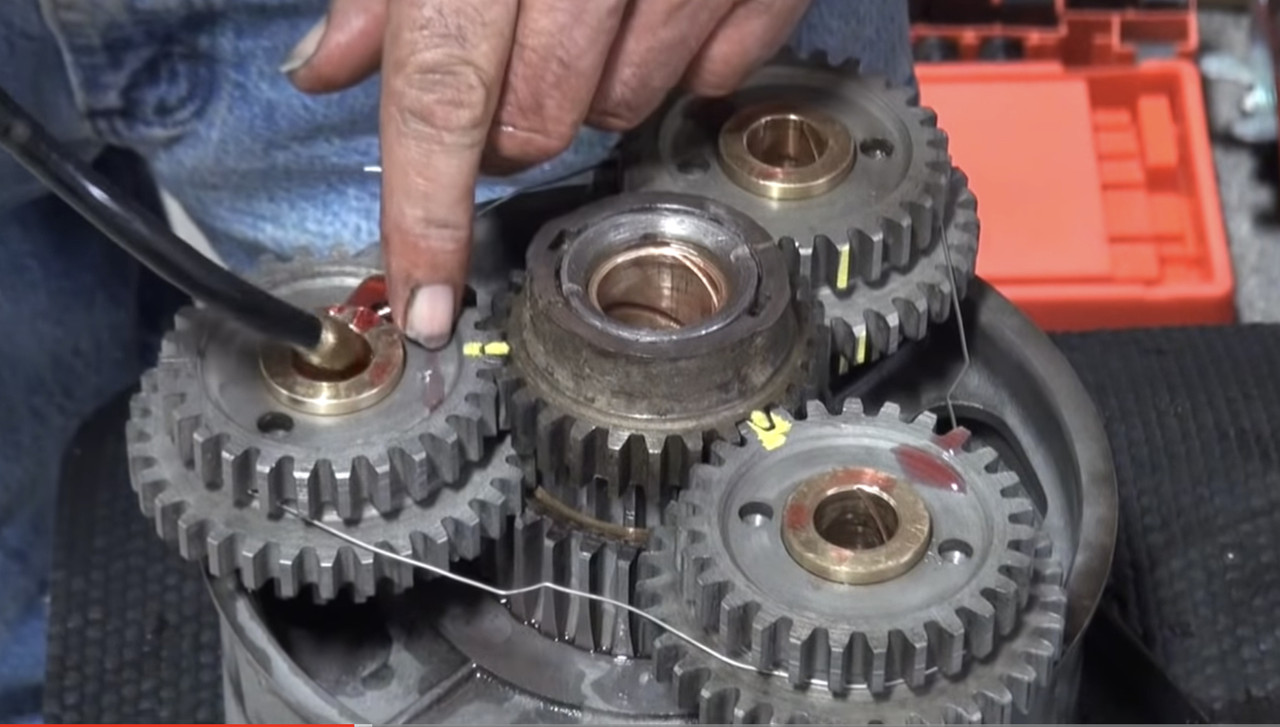 The next step is to flip the assembly upside down and put it on the flywheel. The triple gears are wired to keep them from falling out during this operation. Here is the flywheel, with the triple gear pins ready to accept the triple gears  Here are the triple gears being installed on the pins and the main transmission shaft: 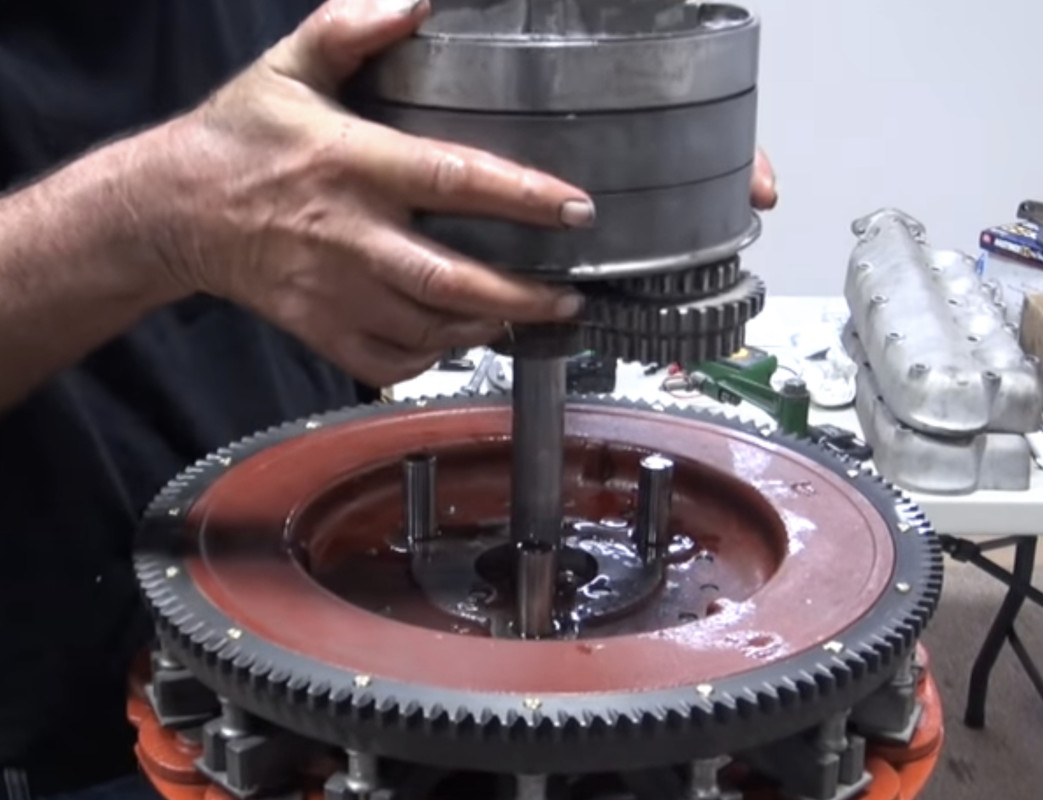 Here is the assembly so far. The flywheel goes next to the engine, and the other end of the assembly is ready for installation of the clutch basket and clutches. Don't forget to remove the wire or carnage will occur. 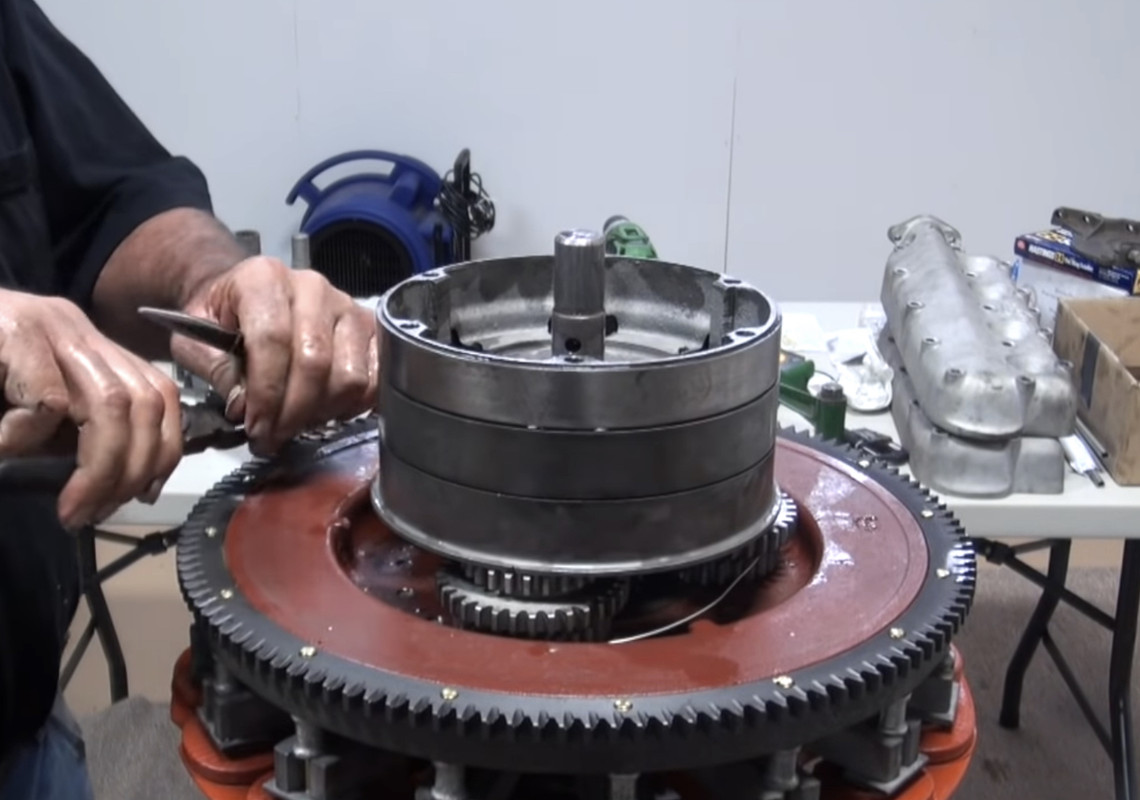 Here is the clutch basket, which rests inside the brake drum. There is an end-play spec for the clutch basket on the main shaft of 0.015" to 0.027". End play is adjusted by adding shims under the clutch basket. After adjusting end-play, the clutch basket is keyed and set-screwed to the transmission shaft. 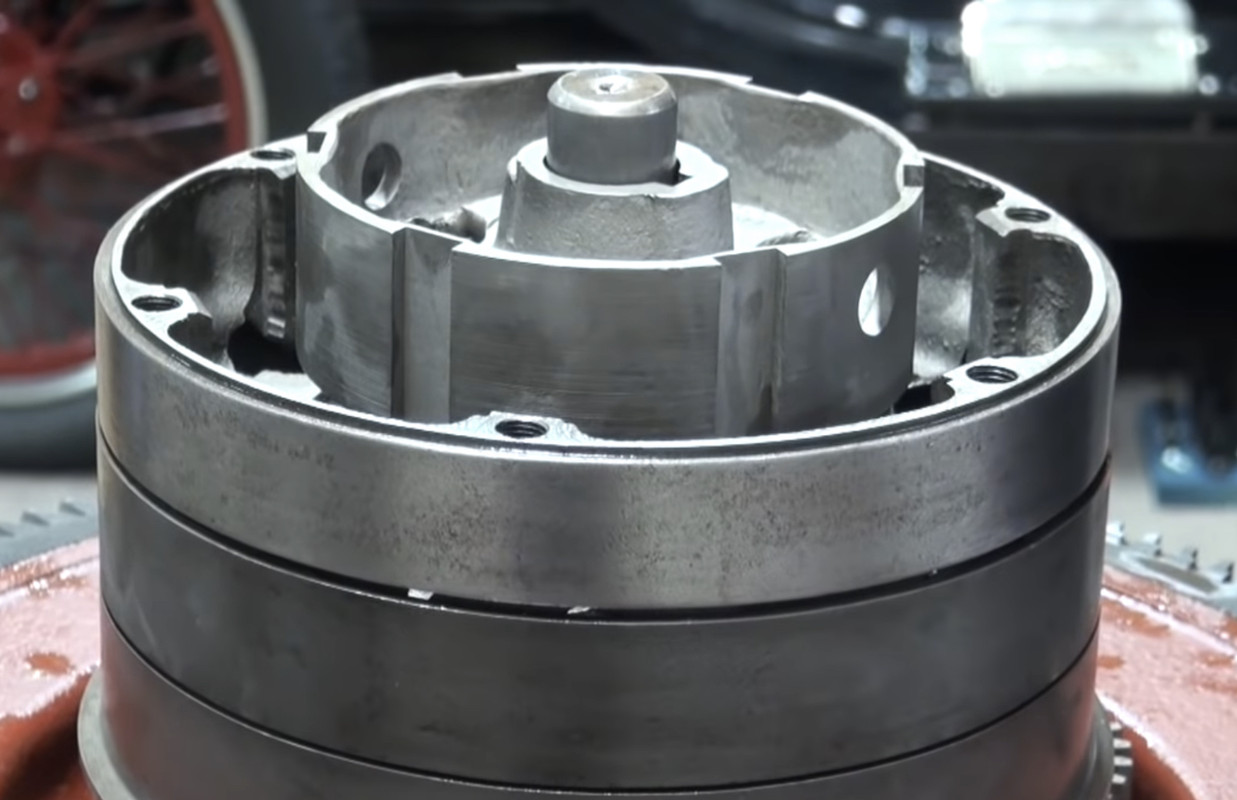  Time for the clutch assembly. Here is a schematic of that assembly. 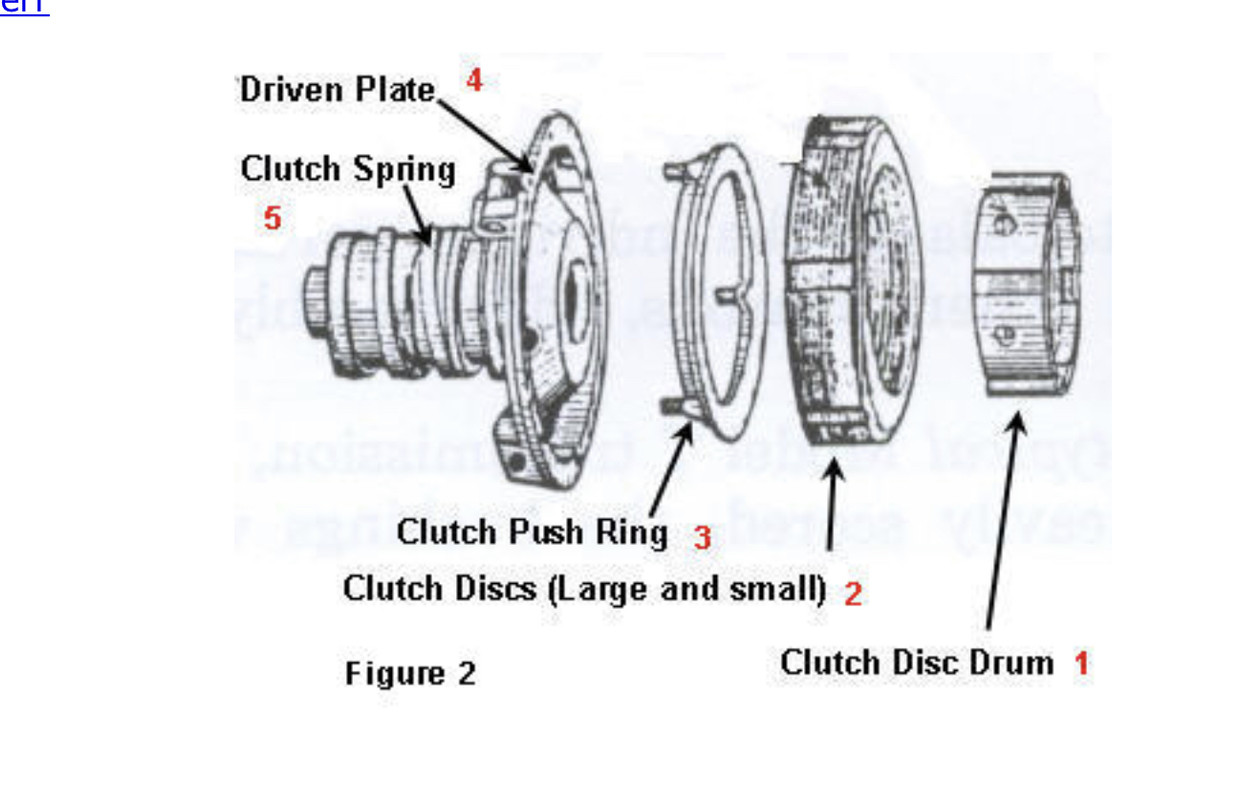 Here are all the steel clutch discs  The clutch discs are placed between the clutch basket and the brake drum.  Half of the discs are keyed into the clutch basket. The other half are keyed into the brake drum.  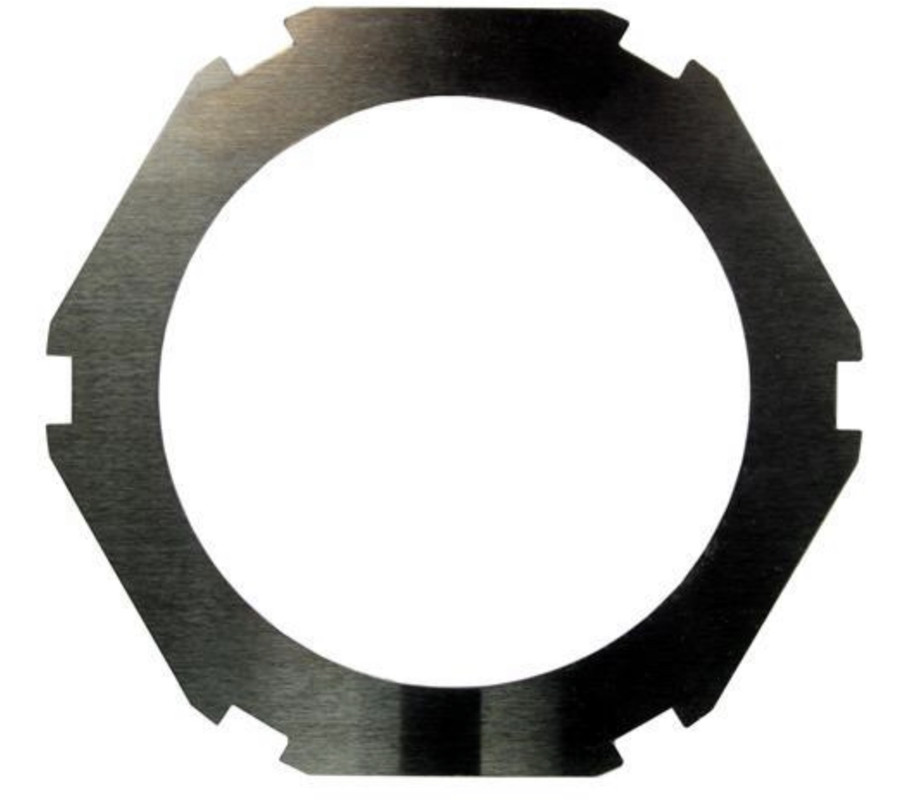 When the discs are allowed to slip next to each other, you are in neutral. When the discs are locked together by pressure from the clutch spring, you are in gear. The clutch spring acts on the drive plate fingers, which bear on the clutch push ring, which compresses the clutch pack. Here is the clutch spring. The spring is tested before installation. Spec is 90 lbs minimum at 2" compression 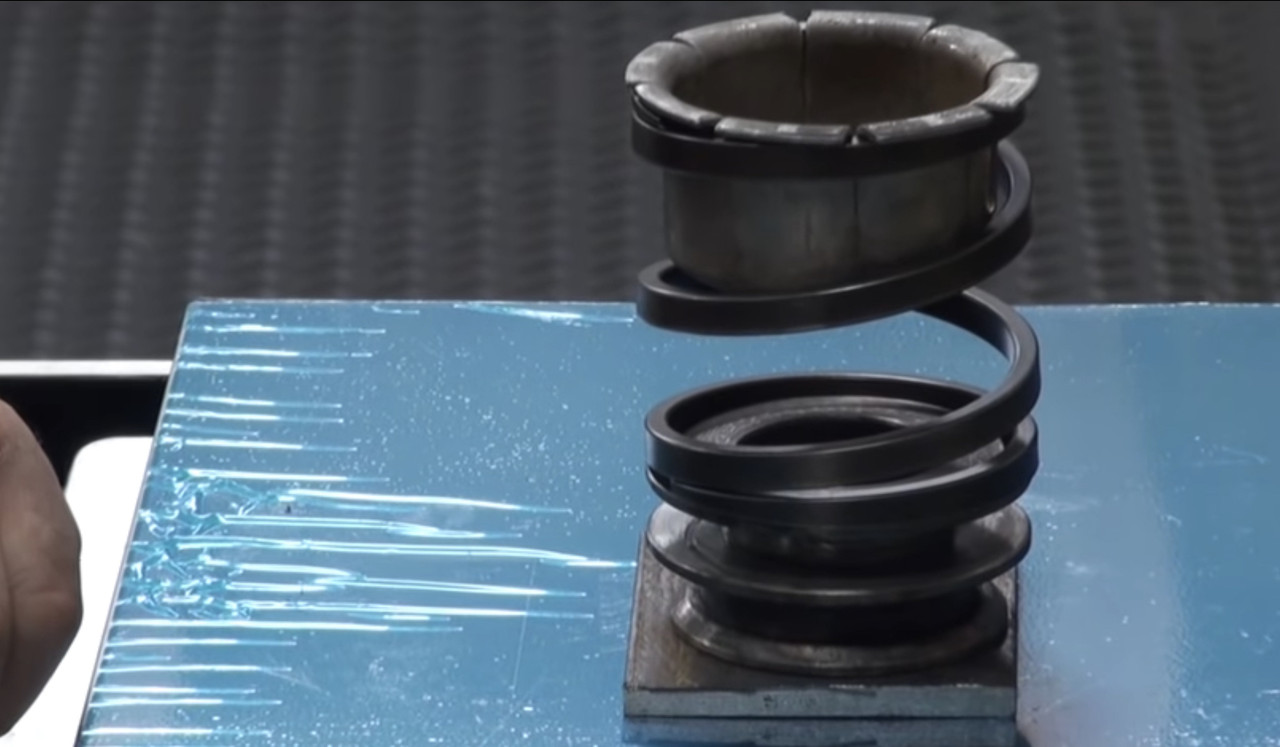 Here is the driven plate. It is pre-installed and checked for run-out. Before the drive plate is installed, a freeze plug must be installed down its hollow shaft. It what the factory did as well. The purpose of this plug is to keep oil in the transmission, and off your garage floor. Here is the freeze plug 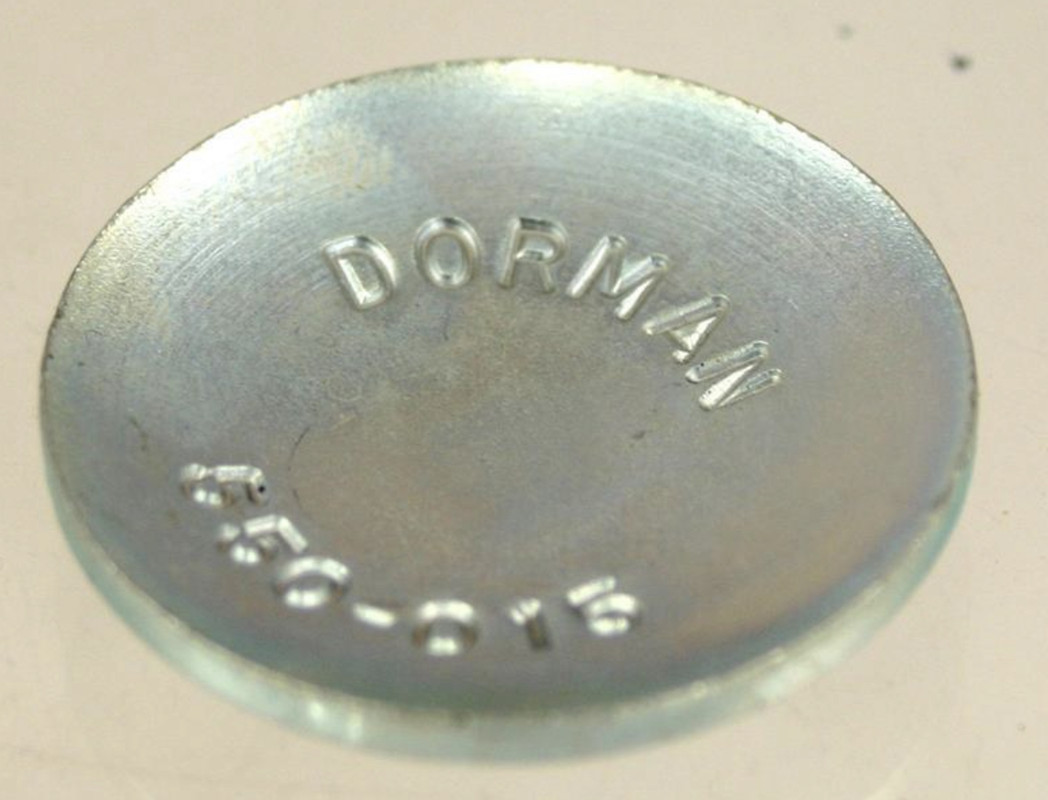 The plug is driven down with a drift or socket extension until it sets on a shoulder on the inside of the driven plate shaft. Permatex is used to help it remain leak-tight. 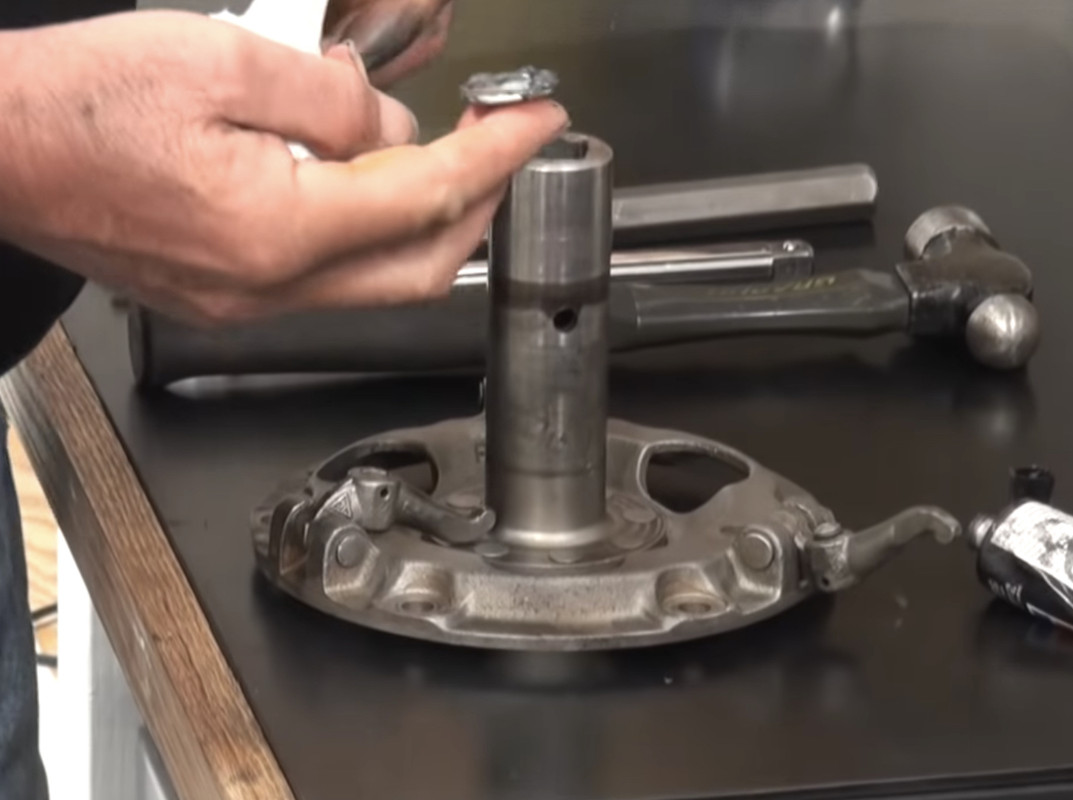 Almost there. The clutch push ring in placed on top of the clutch pack. The driven plate is placed on top of that and bolted to the brake drum. Runout is double-checked. 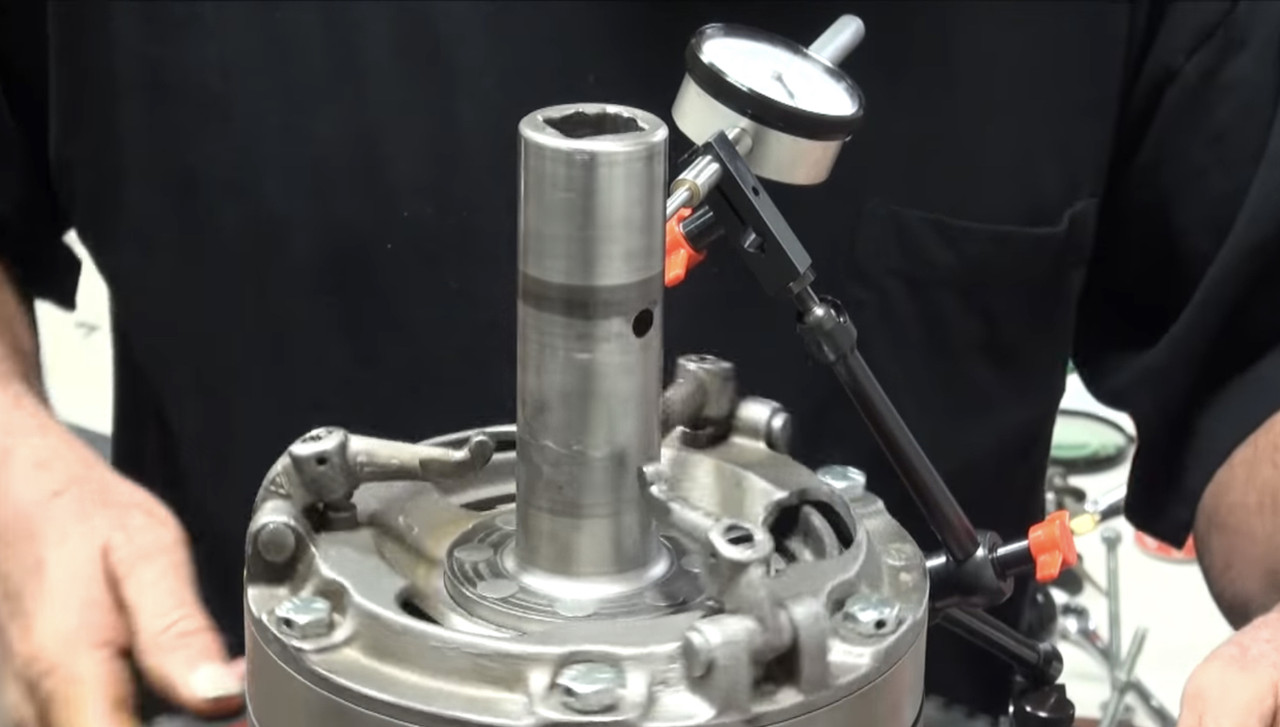 Next comes the clutch collar, clutch spring and cup. Via mechanical linkage connected to the high-low-clutch pedal, a "fork" that slides into clutch collar can compress or release the clutch spring. With that pedal pushed half way down, the spring pressure is released and the clutch plates allowed to slide next to each other, giving neutral. When the pedal is released, the spring acts on the clutch pack to lock it up and provide either forward or reverse. 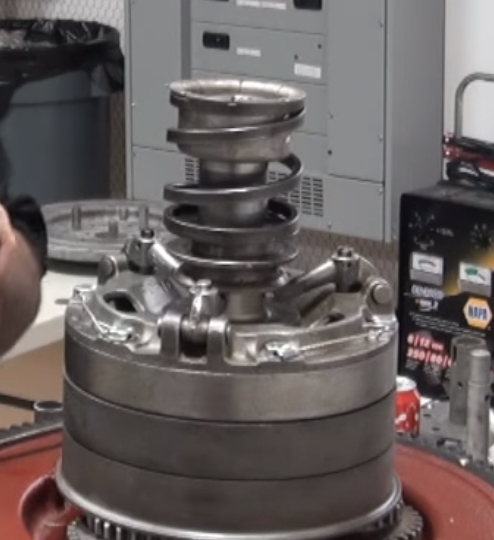 The Clutch spring is compressed and a cross-pin is installed locking the cup and the driven plate shaft.  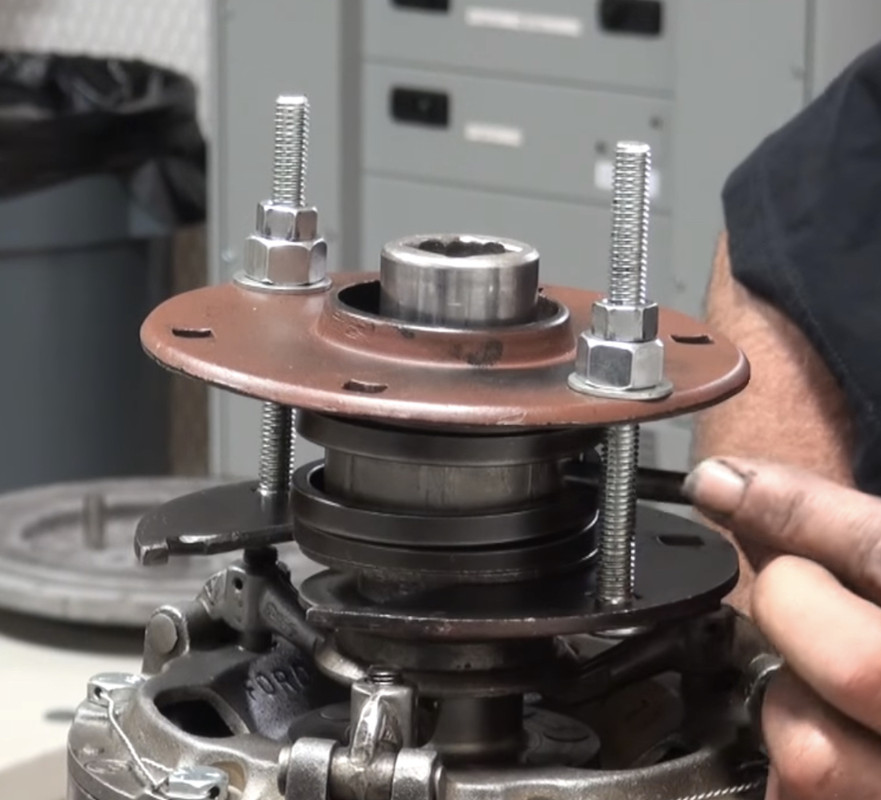 The driven plate fingers are adjusted with a screwdriver, to compress the clutch spring to 2". Then cotter pins are installed. 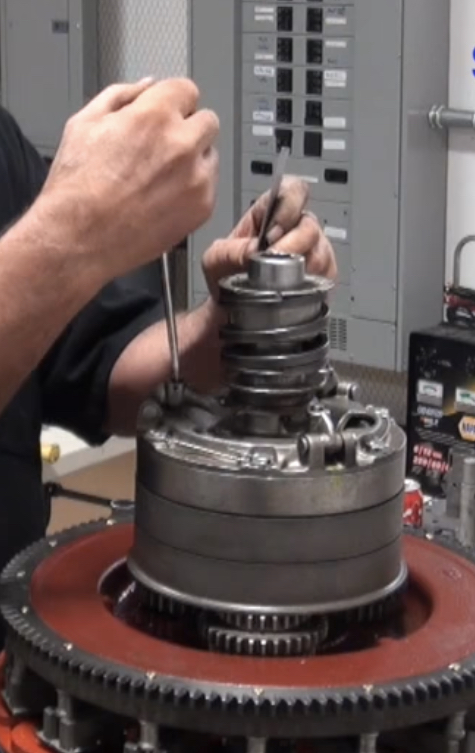   This completes the transmission assembly. Next up the transmission is attached to the rear of the engine, and the whole thing is dropped into the truck. Last edited by Arisaka on Thu Mar 31, 2022 10:17 am, edited 5 times in total. |
| Thu Mar 31, 2022 9:04 am |
|
|
Site Supporter Location: Everson, WA Joined: Sun Jan 6, 2013 Posts: 28191 Real Name: Ace Winky |
Can't find the LIKE button.
Did MP take it away again?  _________________ Why does the Penguin in Batman sound like a duck? Because the eagle sounds like a hawk. |
| Thu Mar 31, 2022 9:07 am |
|
|
Site Supporter  Location: RENTON Joined: Fri Mar 25, 2011 Posts: 20771 Real Name: John |
I just can't get enough of this thread, It should be a sticky in a Model T forum!
_________________ Mr. Q wrote: so basically, if you have to smoke some asshole, make sure they become fertilizer and then Bounce? got it. Guntrader wrote: Huh, maybe I was an asshole. NRA Member/RSO SAF 5 Year Donor GOA Member |
| Thu Mar 31, 2022 9:57 am |
|
|
Site Supporter Location: Tacoma Joined: Sat May 4, 2013 Posts: 6217 |
Updated
|
| Thu Mar 31, 2022 1:42 pm |
|
|
Site Supporter  Location: Downtown Newcastle Joined: Sat Mar 5, 2016 Posts: 3450 Real Name: Traut |
Wow, glad I tuned in. What fascinating photos, drawings and processes. Amazing. There 8s somethinf indescribable about restoring/preserving such things, moreso when there is a family connection with the project.
._________________ I always thought growing old would take a lot longer..... So, when does that "Old enough to know better" shit kick in??? I've learned that pleasing everyone is impossible, but pissing everyone off is a piece of cake. |
| Thu Mar 31, 2022 3:53 pm |
|
|
Site Supporter Location: South Seattle Joined: Thu May 2, 2013 Posts: 12475 Real Name: Steve |
Agreed with all the above.
Still fascinating!  |
| Thu Mar 31, 2022 10:53 pm |
|
|
Site Supporter Location: Tacoma Joined: Sat May 4, 2013 Posts: 6217 |
With the transmission assembled, its time to attach the bands. The bands are similar to brake shoes, except the clamp around the drums from the outside. Their function is to stop one of the drums from rotating. if you press on the reverse pedal, that band stops the reverse drum from rotating, and direct the torque through the triple gears and back to the driveline. The low speed pedal does the same thing. The brake pedal stops the brake drum from rotating, and since that drum is permanently attached to the engine and driveline, it stops the car. Here is one of the bands.
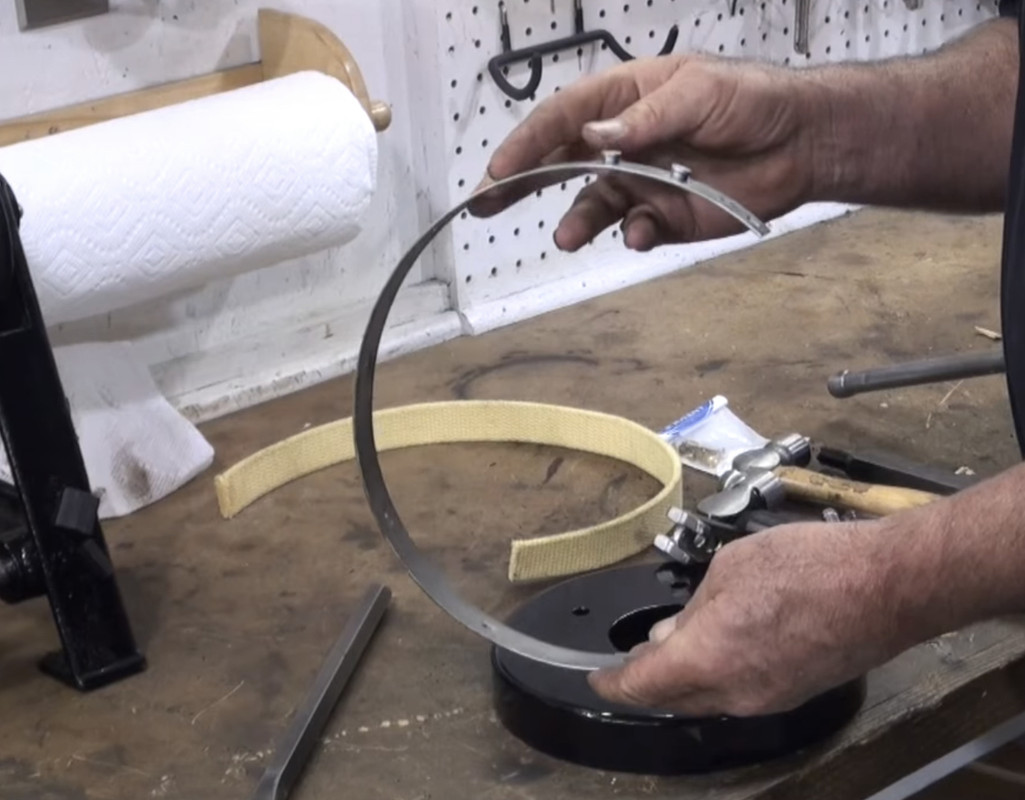 The bands used to be lined with wood, or a woven fabric material. Today, most people use kevlar linings. Here are a set of Kevlar band liners, 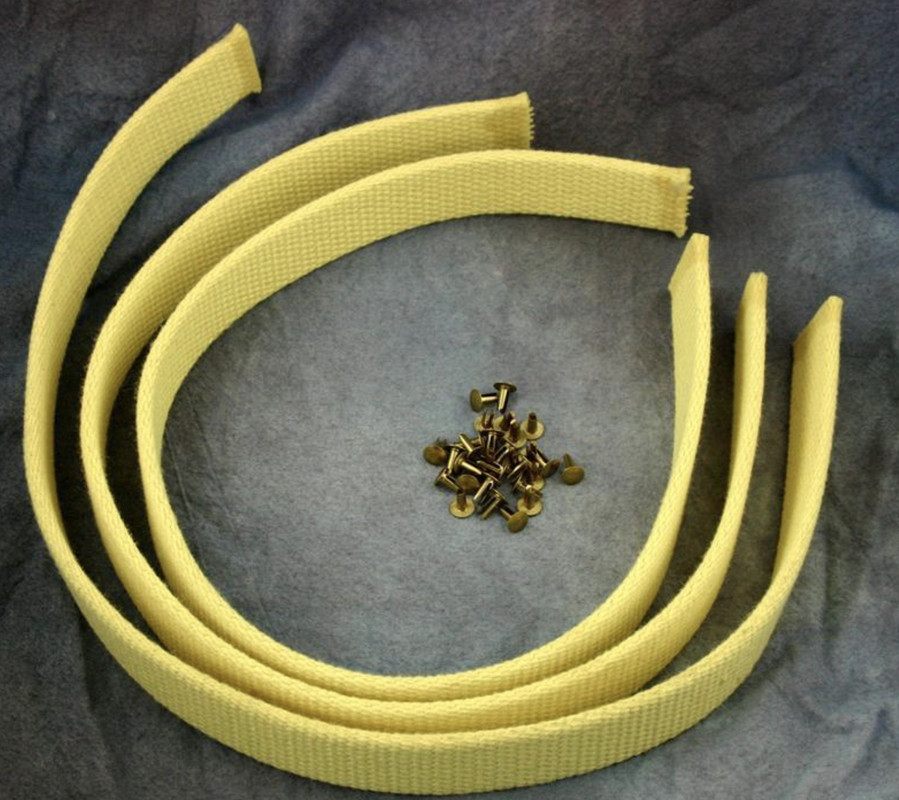 The band liners are attached with brass split-rivets. The rivets are driven through the band and the liner, and the tail is peened over. 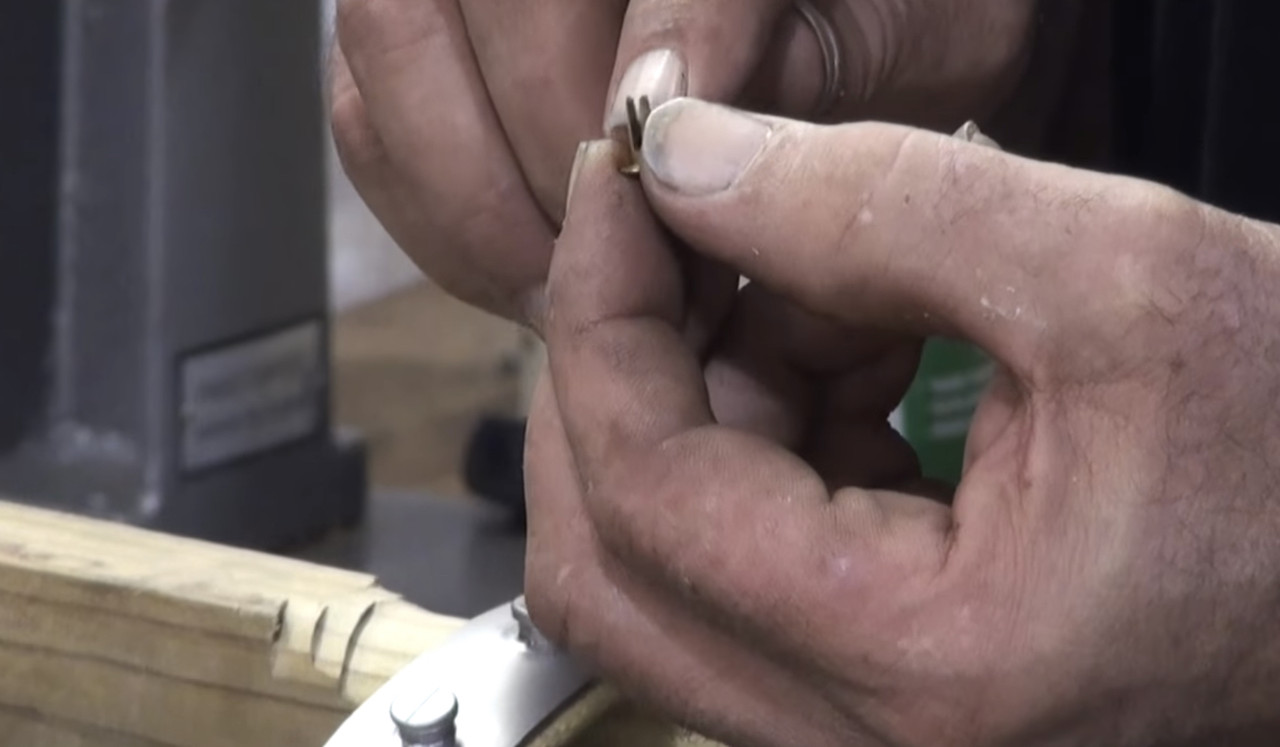 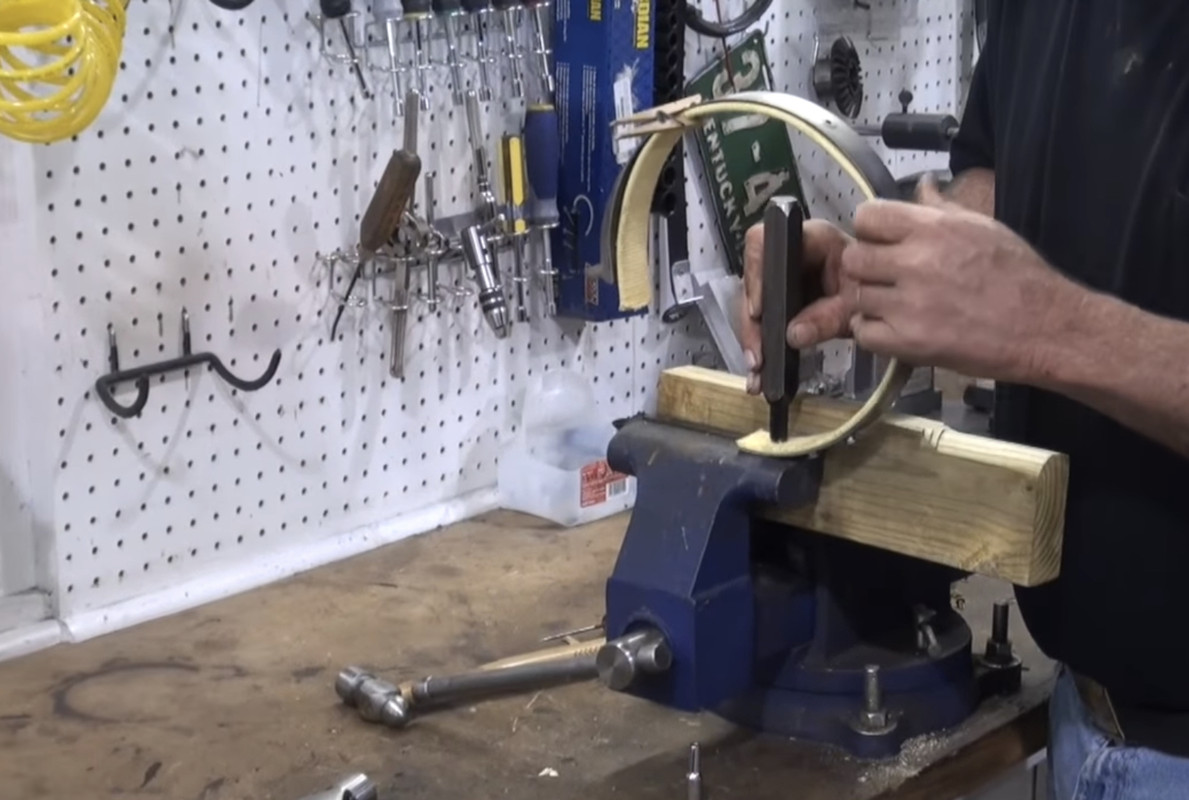 The band assembly is placed over the drum, and you repeat the process for the remaining two drums.  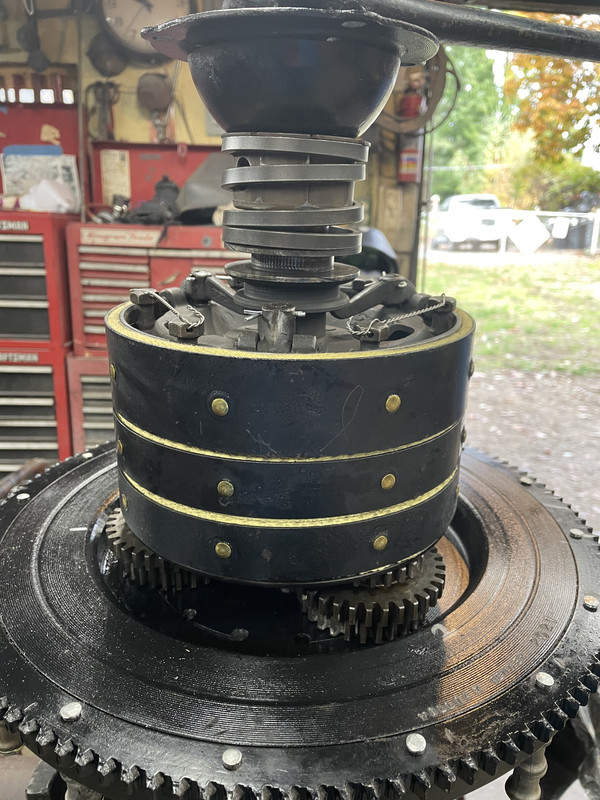  The transmission is sandwiched between the oil pan and the upper transmission cover, which is called the "hogshead". Here is the oil pan. It runs the entire length of the engine and transmission, and contains 4 quarts of oil that lubricate both the engine and transmission  On the side of the pan is the inlet for an external oil line, that receives oil from the flywheel and delivers it to the crankshaft's front main bearing. 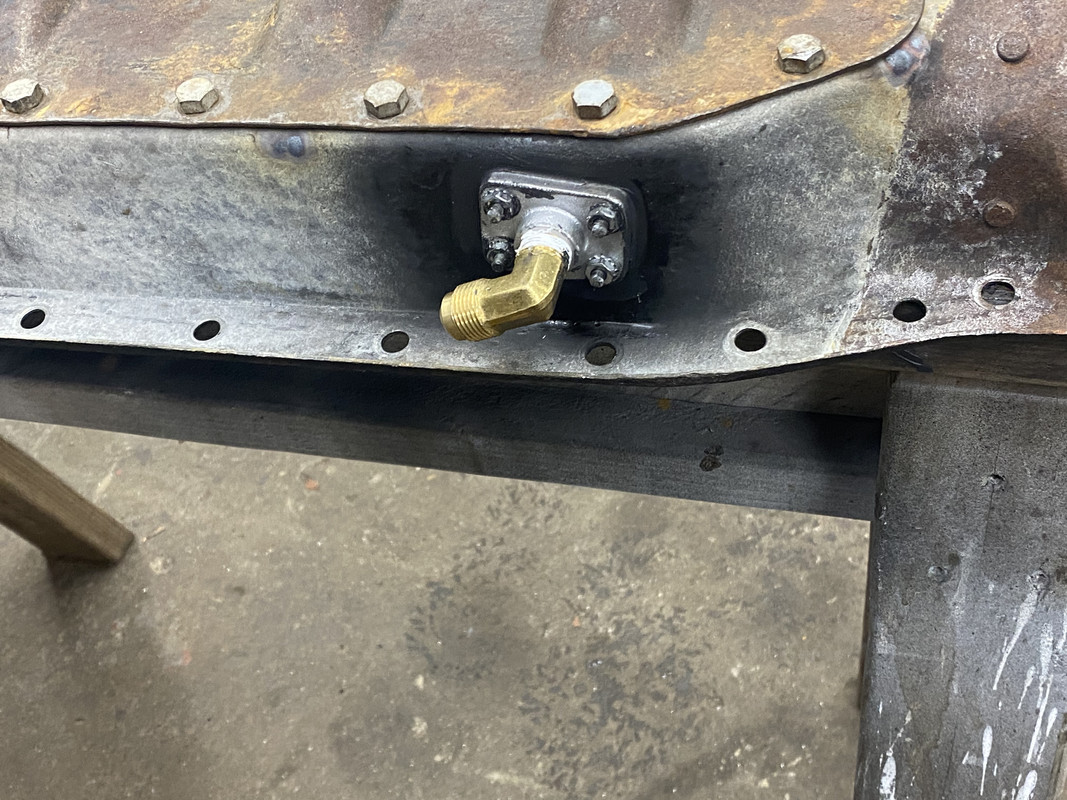 This external oil line is a backup for the factory internal oil line, which also collects oil from the flywheel and delivers it to the front main. It is shown below. However, the factory line can get plugged, and the front main bearing will fail. The accessory external line is just insurance.  Skipping ahead, here is the external oil line installed. 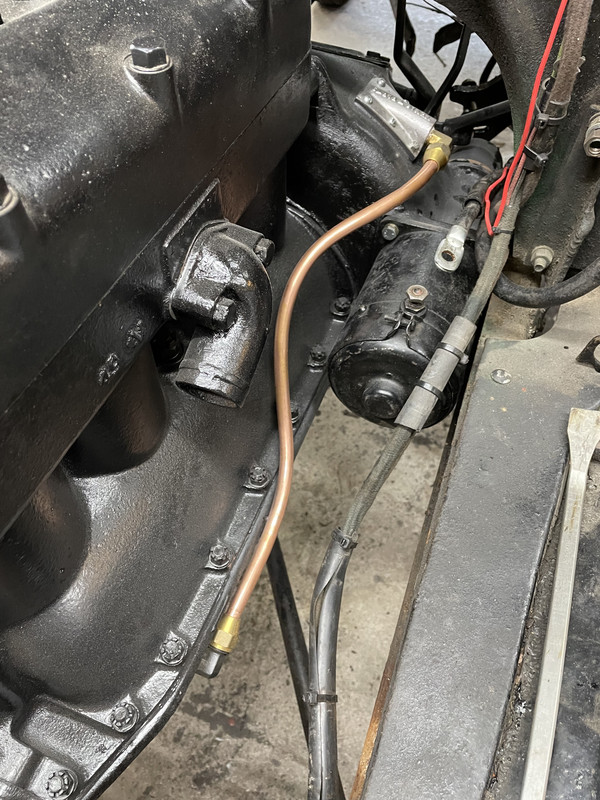 Here is the oil plan installed 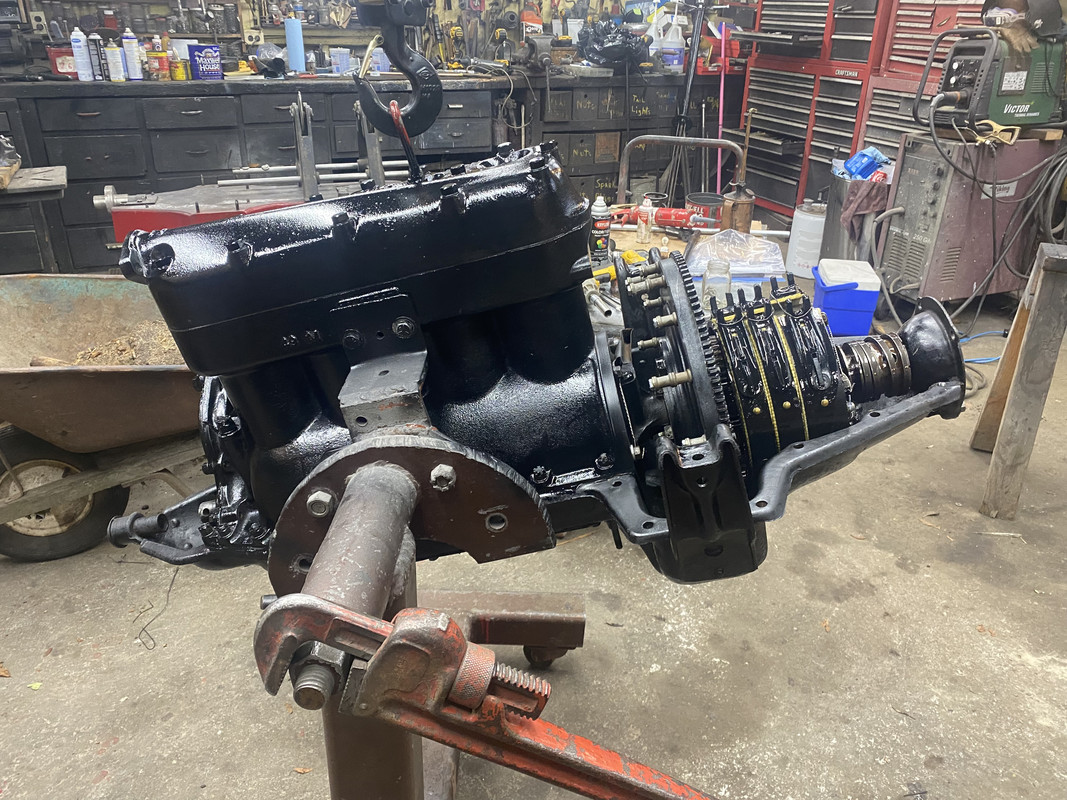 Next is the hogshead, which covers the top of the transmission, and also houses the pedals. 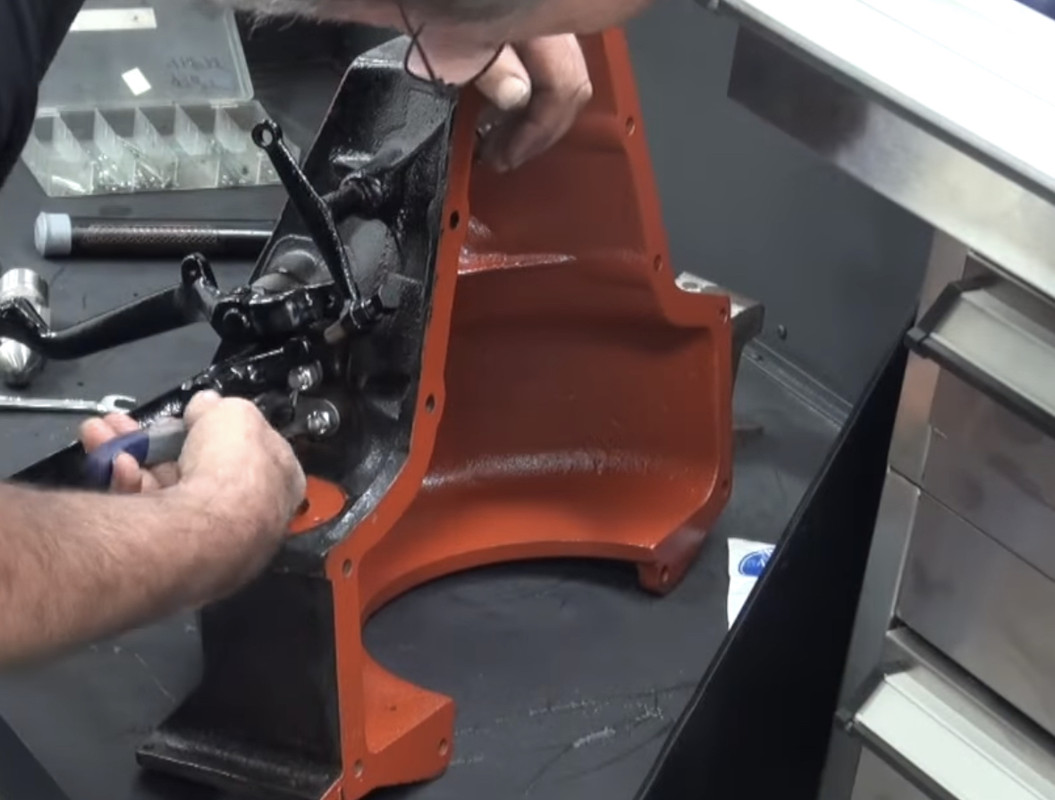 Here is the hogshead bolted in place  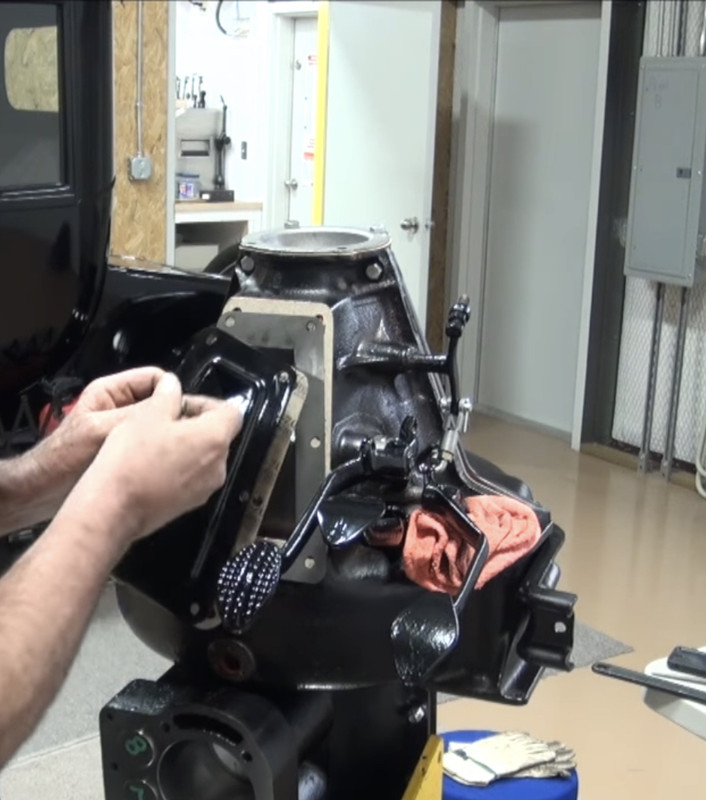 Next the motor gets the manifolds, starter and generator attached, and dropped back into the truck |
| Mon Apr 11, 2022 10:29 am |
|
|
Site Supporter Location: South Seattle Joined: Thu May 2, 2013 Posts: 12475 Real Name: Steve |
Great details & great pics!
Nicely done! |
| Mon Apr 11, 2022 4:56 pm |
|
|
Site Admin   Location: Renton, WA Joined: Sun Mar 13, 2011 Posts: 52068 Real Name: Steve |
That’s interesting about the external oil line. Maybe a little modern “sporterizing” is good in this situation!
_________________ Steve Benefactor Life Member, National Rifle Association Life Member, Second Amendment Foundation Patriot & Life Member, Gun Owners of America Life Member, Citizens Committee for the Right to Keep and Bear Arms Legal Action Supporter, Firearms Policy Coalition Member, NAGR/NFGR Please support the organizations that support all of us. Leave it cleaner than you found it. |
| Tue Apr 12, 2022 5:46 am |
|
|
Site Supporter Location: Everson, WA Joined: Sun Jan 6, 2013 Posts: 28191 Real Name: Ace Winky |
Yeah I can see why a person, who was say 50 years old, in 1917, saw the guts of this engine and transmission would be amazed.
_________________ Why does the Penguin in Batman sound like a duck? Because the eagle sounds like a hawk. |
| Tue Apr 12, 2022 6:04 am |
|
|
Site Supporter Location: In my Cave near the Cloquallum Joined: Thu Sep 26, 2013 Posts: 7809 Real Name: Jim Sr. |
Thanks, an amazing tutorial on a time machine.
_________________ "You are either with us...as Americans. Or, You are against us. There is no IN BETWEEN." ??? "We cannot negotiate with those who say, 'What's mine is mine, and what's yours is negotiable.'" JFK "Those who would give up essential Liberty, to purchase a little temporary Safety, deserve neither Liberty nor Safety” -Ben Franklin MadPick wrote: I don't think you beat your children enough.  |
| Tue Apr 12, 2022 9:12 am |
|
|
|
Page 25 of 31 |
[ 454 posts ] | Go to page Previous 1 ... 22, 23, 24, 25, 26, 27, 28 ... 31 Next |
|
All times are UTC - 8 hours |
Who is online |
Users browsing this forum: No registered users and 31 guests |
| You cannot post new topics in this forum You cannot reply to topics in this forum You cannot edit your posts in this forum You cannot delete your posts in this forum You cannot post attachments in this forum |